Key Takeaways:
- It is imperative to comprehend the asphalt paving process before work begins.
- It is a complex process that requires careful planning and execution.
- The contractor will develop a paving plan outlining all the steps involved in the installation process.
- The excavation depth will depend on the thickness of the new asphalt layer.
- After excavation, it is important to ensure proper grading and drainage.
- The purpose of the sub-base is to provide a stable foundation for the pavement.
- A weak sub-base can cause the pavement to crack and crumble.
- The base course is installed and compacted using a heavy roller.
- The surface course is the layer you see when looking at a paved road.
- The surface course faces the most wear and tear, so it needs to be strong.
- Butt joints are where two pieces of pavement meet end to end.
- Transitions help the new asphalt blend in with the old.
Asphalt paving is a procedure that is used to install a smooth, hard surface on roads, parking lots, and other areas. It involves using asphalt, a type of pavement made from asphalt cement and aggregate. The aggregate can be either crushed stone or gravel. Several steps are involved in the process, and it is important to understand each of them if you plan to have this type of surface installed on your property. This post will discuss the asphalt paving process so you can better understand what to expect.
Plan the Project
The first phase in the asphalt paving process is to plan the project. This includes deciding on the size and location of the surface that you want to have paved. It is necessary to consider the climate and weather conditions in your area, as this can impact the type of asphalt mix you will use. During the planning stage, the contractor will also develop a paving plan. This document will outline the steps they will take during the installation process. It is important to review this plan carefully and ensure that you understand everything involved. If you have concerns, raise them with the contractor before work begins. This will help prevent any pitfalls or unexpected costs down the line.
Begin Excavating
The next phase is excavating the area. This will involve removing any existing pavement, grass, or other vegetation. The excavation depth will depend on the thickness of the new asphalt layer you are installing. Once excavated, the subgrade will be graded and compacted to create a stable base for the new pavement.
Ensure Proper Grading and Drainage
After the excavation is complete, it is imperative to ensure that the area is properly graded and has adequate drainage. This will prevent water from pooling on your pavement’s surface and causing damage. The subgrade should be sloped so that water drains away from the paved area. If necessary, drainage pipes can be installed to further improve drainage. Once the grading and drainage have been taken care of, the subgrade will be ready for the next step: installing the base course.
Prepare the Sub Base
The sub-base is the layer of material typically made of compacted gravel, and its purpose is to supply a sturdy foundation for the pavement. The sub-base will be installed on top of the graded and drained subgrade. Once again, ensuring that the sub-base is properly graded and drained is imperative to ensure a stable foundation for the pavement. If the sub-base is weak, it can cause the pavement to crack and crumble.
Proof Roll and Compact the Sub Base
After the sub-base, a process called “proof rolling” is performed to check for any soft spots or unstable areas. Once the weak areas have been identified and corrected, the sub-base will be compacted using a heavy roller. The compaction of the sub-base is essential to the strength and stability of the pavement.

Install the Base Course
The next layer in the asphalt paving process is the base course. The base course is installed on top of the compacted sub-base and provides a stable foundation for the surface course. The base course utilizes a mixture of aggregate, binders, and fillers. Once installed, it will be compacted using a heavy roller.
Pouring the Asphalt Surface Course
The next step is to install the asphalt surface course. This layer is usually about two inches thick and uses smaller rocks called aggregate, oil, sand, and asphalt. Asphalt is a sticky substance that holds everything together and gives the pavement its black color. The surface course is what you see on a paved road. It is also the layer that faces the most wear and tear, so it needs to be strong.
Butt Joints and Transitions
Once the surface course is installed, the paving crew will create butt joints. Butt joints are where two pieces of pavement meet end to end. The crew will also create transitions where the new asphalt meets an existing road or driveway. Butt joints ensure that drivers don’t feel any bumps as they travel from one section of pavement to another. Transitions help the new asphalt blend in with the old.
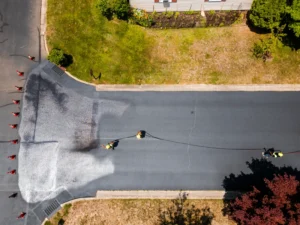
Let the Surface Cure
After the paving crew has finished laying the asphalt, they will compact it with a large roller. This step ensures that there are no air pockets in the pavement and that it is evenly compacted. Once compacted, it needs time to cure or harden, usually 6 to 12 months. However, you can allow traffic after three full days.
Line Striping and ADA Compliance
After the new surface has been installed and butt joints and transitions have been created, the paving crew will do the line striping. Line striping is important for both aesthetics and safety. The crew will also ensure that the new pavement complies with the Americans with Disabilities Act (ADA). It means that there will be wheelchair ramps at all curbs, and crosswalks will be lowered to meet the needs of people with disabilities.
When Should You Sealcoat Your New Asphalt Pavement?
Wait at least six months to one year before sealcoating your new asphalt pavement. Sealcoating protects your pavement from the sun’s UV rays, weather damage, and oil and gas spills. It also makes it easier to clean and keeps it looking new for years.
Once you complete the paving project, you can enjoy your new, smooth surface! A properly installed pavement can last for many years with minimal maintenance. But like any other investment, it’s necessary to take care of your pavement and repair any cracks or potholes as soon as they appear.
a specialized task that requires precision and skill. The professionals at Standard Paving & Concrete serving Baltimore, MD, have the experience and expertise to get the job done right. We’ll develop a custom paving plan that meets your specific needs and budget. We’re the ideal company for all your asphalt paving needs with our quality workmanship and competitive pricing.
Get a free estimate today!